Want to buy or sell something? Check the classifieds
  • The Fedora Lounge is supported in part by commission earning affiliate links sitewide. Please support us by using them. You may learn more here.

New "How to make a bow" TUTORIAL by FORTINO37

John Galt

Vendor
Messages
2,080
Location
Chico
I've had another look at the hat per TJ's request, and it looks like it was actually done with one piece of ribbon & no cording. It was all an optical illusion. My pride is tarnished, but at least my fallibility remains intact.

u6enu3a5.jpg


"Faint hat never won fair lady."
 
Last edited:

T Jones

I'll Lock Up
Messages
6,795
Location
Central Ohio
I've had another look at the hat per TJ's request, and it looks like it was actually done with one piece of ribbon & no cording. It was all an optical illusion. My pride is tarnished, but at least my fallibility remains intact.

u6enu3a5.jpg


"Faint hat never won fair lady."

Not tarnished bad enough to where I won't have you do a "Lawless, Hardy Hat" conversion for me! ;) You up to it?
 

John Galt

Vendor
Messages
2,080
Location
Chico
Here's a variation I'd not seen before, on a relatively modern Worth & Worth I'm working on. There is no gap behind the bow, and the ribbon is actually _folded back_ to "dive" under the bow, rather than just creased & stitched (although it is still lightly creased & then stitched). The consistent thing is the way the taper was removed by (iron the curve first) tacking the bottom ends first & then the top.

7yrenugu.jpg
 

Greyryder

One of the Regulars
Messages
148
Location
Ohio
Just finished my first ribbon job, thanks to this thread. It's not perfect, but it's mine. :cool:

hat4.jpg


The triple bow is pretty much a direct rip off of another Biltmore I've seen online, but the knot is all mine. (though I wouldn't be surprise if it's been done before) I did sort of an offset overlapping fold in the navy blue ribbon, and tucked that baby blue ribbon in under it.

Might not keep the feather. The hat doesn't really need the extra color, now that I've gotten rid of that gray ribbon.

Click for gratuitous before image.
 

scottyrocks

I'll Lock Up
Messages
9,178
Location
Isle of Langerhan, NY
Just finished my first ribbon job, thanks to this thread. It's not perfect, but it's mine. :cool:

hat4.jpg


The triple bow is pretty much a direct rip off of another Biltmore I've seen online, but the knot is all mine. (though I wouldn't be surprise if it's been done before) I did sort of an offset overlapping fold in the navy blue ribbon, and tucked that baby blue ribbon in under it.

Might not keep the feather. The hat doesn't really need the extra color, now that I've gotten rid of that gray ribbon.

Click for gratuitous before image.

Very nice job!
 

John Galt

Vendor
Messages
2,080
Location
Chico
Well, Here's a little tidbit I found in the Practical Hatter - similar method of attaching the ribbon hatband to what I saw & posted recently, on the Locke & Locke hat.

uga9u6u4.jpg
 
Last edited:

John Galt

Vendor
Messages
2,080
Location
Chico
I have not, and am a little concerned it might leave a bit of a wrinkle, but I plan to try it as well. I will probably put a little fold and a stitch in each end after joining, to address that issue & pin it down.
 

John Galt

Vendor
Messages
2,080
Location
Chico
Tacking the bottom edges down and then drawing the top tight as described might be a good intermediary method.
 

Hat and Rehat

Call Me a Cab
Messages
2,444
Location
Denver
I am going to revive this old thread. Many of us probably didn't know it existed and I believe we may now have a better pool of knowledge here to contribute to it.
Here is a Mallory possibly from the 40s that I stripped before a gas bath. It's a great felt but very faded as you can see from the shadow of the bow. I'm sharing this because the ribbon/boy treatment differs from any others in the thread and from any other hat I've stripped.
The black thread used to pull the ends of the ribbon together originally returned to the end of the ribbon toward the front of the hat and pulled both ends together very tightly as well as pulling the top of each end down behind the bow (which is one of my plastic storage boxes).
The unreeded sweat had pretty much fallen out due to the holes where it was stitched in disintegrating. This is too nice a hat for my first attempt at sewing in an unreeded sweat so I plan to send it off, but do intend to do the hatband myself.
2020-03-28 14.23.10.jpg

Ermatinger talked about flipping good, but faded ribbon backwards to expose the unfaded side, which is my plan.
I found this interesting:

2020-03-28 14.28.06.jpg


Looking at the top edge of the inverted ribbon you can See that the edge reveals a little bit of the color from the faded side. I still plan to flip the ribbon, at least until I can get vintage Grossgrain in that color. Another reason is I don't mind the look. In fact;
2020-03-28 14.37.11.jpg
2020-03-28 14.38.05.jpg

Above is my lone Mayser. After it arrived from Geece I commented on the interesting ribbon with the contrasting edge, which I liked. Now I suspect what I have is a Mayser with a flipped, faded ribbon.
Cheers everyone! I've been lurking a bit here and there but haven't been posting very much. I'm back, but probably in a more limited way. I enjoyed the comraderie and shooting the hat sh#t with everyone, but it was hurting my productivity. I missed your company for the last couple of months.
 

Attachments

  • 2020-03-28 14.24.34.jpg
    2020-03-28 14.24.34.jpg
    3.6 MB · Views: 1,505
  • 2020-03-28 14.29.39.jpg
    2020-03-28 14.29.39.jpg
    3.6 MB · Views: 1,592

hatsandcanes

Familiar Face
Messages
92
Location
Tennessee
81F4496D-5BB6-483C-8824-33F34290984F.jpeg
BD168D69-6E09-4D6B-80E5-F6304BDD6C32.jpeg
FBC1E7ED-29C6-402B-BF27-7C10A2685FA0.jpeg
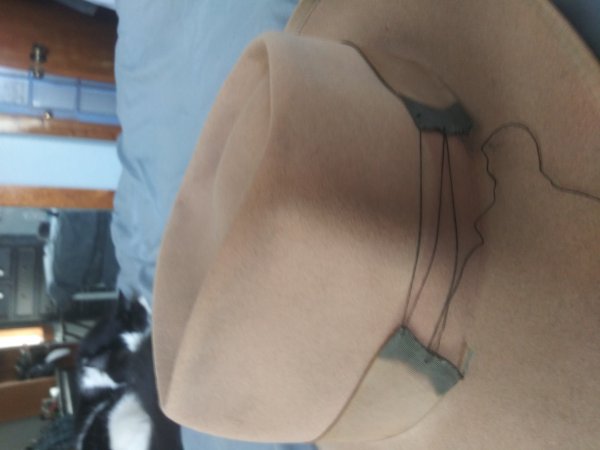
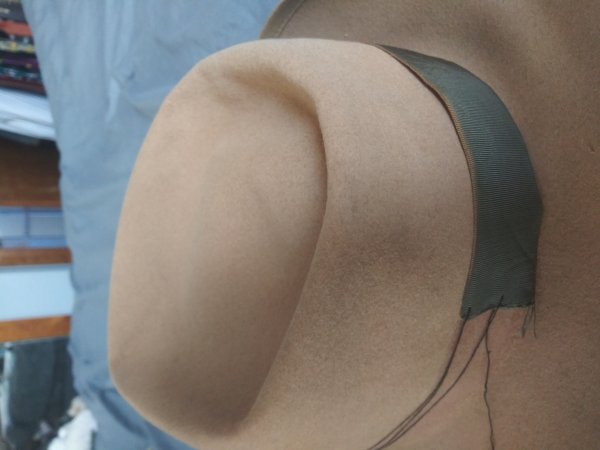
My first attempt at replacing a ribbon and bow. Overall, I am really happy that my ribbon is really snug top and bottom. I did put a small swirl to the ribbon. My bow is okay but I wish it laid down a little more. It appears a little puffy to me. Is there anything I can do to make it lay down a little more. I was thinking maybe a little steam and touch it with a iron. Good or bad idea.
Randy
I really like the contrast the mid gray ribbon does to the hat.....way more than the black factory Stetson ribbon!
 
Messages
10,862
Location
vancouver, canada
View attachment 230562 View attachment 230561 View attachment 230560 My first attempt at replacing a ribbon and bow. Overall, I am really happy that my ribbon is really snug top and bottom. I did put a small swirl to the ribbon. My bow is okay but I wish it laid down a little more. It appears a little puffy to me. Is there anything I can do to make it lay down a little more. I was thinking maybe a little steam and touch it with a iron. Good or bad idea.
Randy
I really like the contrast the mid gray ribbon does to the hat.....way more than the black factory Stetson ribbon!
To me the most difficult aspect of hat making is that final touch...the bow. I have scoured the internet looking for bow making tutorials to no avail. Hatters that I have talked to advised the learning process is purely trial and error. I am heavily into the error portion. What you did looks good IMHO.
 
Messages
19,001
Location
Central California
To me the most difficult aspect of hat making is that final touch...the bow. I have scoured the internet looking for bow making tutorials to no avail. Hatters that I have talked to advised the learning process is purely trial and error. I am heavily into the error portion. What you did looks good IMHO.


The one part of the hat making process that Art didn’t allowed to be filmed was his bow work. I suspected it had to do with his contrasting color bow keeper, but it’s telling that the bow was the only “secret” part.
 

Forum statistics

Threads
109,326
Messages
3,078,959
Members
54,243
Latest member
seeldoger47
Top