Want to buy or sell something? Check the classifieds
  • The Fedora Lounge is supported in part by commission earning affiliate links sitewide. Please support us by using them. You may learn more here.

Vintage Appliances

Edward Reed

A-List Customer
Messages
494
Location
Aboard a B-17 Flying Fortress
When her grandmother passed away several years ago, she left us the house and everything in it. Becky's grandfather was a fighter pilot in the war and when it ended, he went to back to school for medicine. After his training he was the town doc and his office was the bottom half of the house. So we had some pretty cool stuff in the house with us to say the least. Old photos, models and even gear that was donated to the college and their flight training program that they now display in their lobby.
wow! that must have been fun and interesting to go through all of that. I would have loved to have an opportunity like that! amazing!
 

JC225

One of the Regulars
Messages
103
Location
Michigan
It was quite an adventure sorting through literally 60 years of accumulation. They moved into the house in 1954 and then we moved in after Becky's grandmother passed. So it went from them to us and it was something else to see and sort through all of the history.
 

Edward Reed

A-List Customer
Messages
494
Location
Aboard a B-17 Flying Fortress
I use this vintage Nasco Champion Percolator Urn on the weekends. I found the design of it to be of a more masculine look which made it appealing to me when I looked for a percolator to add to my vintage coffee area. Not sure what it dates to but it looks rather 1930s to me. Maybe someone here has an idea? works well and is a small 8 cup perc but I usually only perc 5 or 6. Fun to use and small enough to not take up much space. one day I'll replace the replacement cord with a more appropriate cloth covered one to finish the look. All of the bakelite parts are in excellent shape.

IMG_1203.JPG
IMG_1210.JPG
IMG_1211.JPG
IMG_1228.JPG
bottom.jpg
 

Studebaker Driver

One of the Regulars
Messages
223
Location
The Big Valley in the Golden State
So.
Since the Central Valley in California has been getting up into the thousands of degrees this year, there has been zero cooking on the wood stove and that really bums me out. I love cooking on it beyond all telling, but there is just no way without air conditioning in the house.

But a couple of weeks ago, at an estate sale, I saw a really good looking wood/gas combination stove made by Garland. This is not a 1920s gas stove with a trash burner on one side, it is a real dual fuel stove; the wood fire heats the stove lids on the left and the bottom oven, while the gas fuels the four burners on the right side of the cooktop, as well as the top oven and the broiler. I saw it years ago, it had been restored to like-new condition and was in daily use. When I picked it up, it had been disassembled to make moving it easier (to make moving it possible). Looking at the components, everything about it is in great shape. The body of the stove is black and looks like a common wood burning stove, but it has tons of nickel plating on it. Every single door, for the upper and lower ovens, the firebox door, the ash door, has a wide nickel plated "picture frame" around it. All of the doors are white porcelain, with the black and nickel and white it is just the coolest thing. But I don't know the first thing about Garland stoves. I can't wait to get it in the kitchen and put together.

One other thing at the estate sale was a Monitor top refrigerator. I have a Monitor top, but it is an "apartment" size one and is very cramped. It works flawlessly, but it is just too little inside. It is the only fridge I ever bought - and I bought it 40 years ago. So a friend wants the little one, I'll have to hire movers to bring the bigger one into the house. It isn't that big and you wouldn't think it would be that heavy, but it's like a safe. Three of us struggled getting it down the steps of the Victorian house it came from. Remembering what it was like controlling its slide down the slope of the steps, there is no way in the world we could get that thing UP the steps into this house.
 

LizzieMaine

Bartender
Messages
33,715
Location
Where The Tourists Meet The Sea
Those "combo" stoves were designed for homes without central heating -- we had a kerosene/LP gas stove when I was growing up that was the same idea. You kept a constant fire burning in the "heater" side to heat the kitchen and adjacent rooms, but used the gas for routine cooking. Ours also had a copper coil going thru the heater section for heating household hot water that fed into a big copper holding tank in the bathroom.
 

Studebaker Driver

One of the Regulars
Messages
223
Location
The Big Valley in the Golden State
Of all the things about this house, one of the dearest were my long and frequent talks with the daughter of the builder (she was then in her 80s). Her father gifted the house to her as a wedding present in 1936. Her memories of it, going back to about 1920, were riveting to me. When the house was built in 1911, in those pre-air conditioning days in California's hot central valley, it had a wood/coal burning kitchen range along with an electric stove on the other side of the room. There were a few gas water heating outfits in affluent areas, but most everyone else had a water coil in the firebox of their kitchen stove that was plumbed into a standing galvanized steel water tank nearby. Early on, the tanks stood sentry behind the stove, its elevation critical to assure proper "thermosyphon" water circulation through the coil; Exiting the hot coil, the water was conducted to the top of the tank and cooler water from the bottom of the tank replaced the hot, so there was continuous movement of water from the tank through the stove's coil.

By touching the tank you would determine the amount of hot water. The water at the bottom was coolest and the top was the hottest; by feeling the tank you could estimate how much hot water was available for Saturday night baths. Later (as is the case in this house), the cylindrical water tanks were hidden in cupboards near the stove. By opening the cupboard door you could pat the side of the tank to judge the water's temperature and volume.

Feed water to the tank, from the city supply, was introduced at the bottom of the tank, while the hot water was drawn off at the top.

The electric stove was for hot weather use. It could cook breakfast quickly and easily without making the house into a kiln in summer months. It was, however, expensive to use and so it was used sparingly. But in July and August, when it was likely to be 100+ degrees, it was worth it. The electric range was also used to heat a pan of water for dish washing when lighting a fire in the stove to wash dishes would have been a crime. The wood burning stove backed up to a wall, on the other side of which is the dining room and there, directly on the other side and sharing the same flue in the separation wall, was the "parlor stove" for house heating. This stove was removed from the house every year and stored in the basement to get it out of the way for the summer. It was re-blacked with stove polish before it was brought back onto the dining room in the fall. The old blued stove pipe from last year was thrown away and bright new stove pipe was used to pipe it back in.

The kitchen was remodeled in 1918 and again in 1920. The addition of a doorway effectively removed much of the available wall space. Later still, when the ice box on the back porch became an electric refrigerator that scratched and whined at the back door to be let into the kitchen, the battle for floor & wall space heated up. The electric stove was retired and sold; the wood burner was sold for junk and a gas stove took its place. a new gas water heating outfit moved into the basement and later still, in 1939, a central heating plant was added to the basement population of appliances.

When I bought the house 26 years ago, all the stoves of every variety were gone, they had been sold. The parlor stove had been junked upon the installation of the central system. But the flue in the wall remained. The stovepipe thimbles had been covered with a skim coat of plaster over empty lard cans (tapered, like the stove pipe, they were a perfect fit as metal "corks"). It was an easy matter to tap the plaster with a hammer, shattering it, and re-opening the stove pipe holes.

When I put the wood stove in the kitchen, it was only a matter of buying some pipe at the hardware store and slipping it into place. I didn't even have to trim the length of the pipe. Likewise the parlor stove. The new pipe joints snapped together and slipped on, the elbow at the top was at the perfect elevation to go into the thimble. There was nothing to it. I learned from the daughter of the builder that her father was very proud of himself for considering standard 24" stove pipe lengths when he was placing the thimbles in the walls.

Before I did this, I checked the condition of the flue and it was sound and very clean. While I was clomping around in the attic looking at the flue, guess what?! There, hidden behind the flue, was the original galvanized hot water tank! When it was put out of service, workmen had disconnected it and lifted it bodily up into the attic space. There they tipped it on its side, out of the way behind the concrete flue. Truth be known... I actually considered pressing it back into service. But after the first summer living with the wood burner, I scrapped that bright idea!

I still don't have room for two kitchen stoves (although I found and bought a 1910-era electric one), so the combination is the best solution. If I had a single brain cell flashing, I would install a sleek, modern induction cooktop and spacious convection oven and forget all this nonsense about old timey stoves and Monitor top fridges. But I can't. My brain is wired wrong or something. It would sure make life easier to be wired "the right way".
 

MisterCairo

I'll Lock Up
Messages
7,005
Location
Gads Hill, Ontario
Not vintage, but retro enough we like them. Also, the colour is killer and matches our backsplash.

SMEG brand from Italy. Europeans do not use drip coffee makers like we do, but demand from North America made them come up with the basket drip maker.

The espresso machine, a darker blue, is a Breville.

20220218_114833.jpg
 
Messages
10,930
Location
My mother's basement
^^^^^
We’re on our second Breville espresso machine. The first one gave us 11 years of service and is probably repairable, which is why it occupies a spot on a basement shelf rather than the landfill.

On the shelf next to the old espresso machine is a Sunbeam T9 toaster, ‘40s-vintage, I think. It still works, but not as well as the motorized Breville toaster in the kitchen, which I doubt will still be working when it is 80 or so years old.
 
Last edited:

Studebaker Driver

One of the Regulars
Messages
223
Location
The Big Valley in the Golden State
I'm afraid this may take the knowledge base of someone like LizzieMaine. I've spent a lot of time online searching for even a hint of how, exactly, do early ice trays work?

I bought a second 1934 GE monitor top at an estate sale and it came with two original ice trays. But they're not the usual vintage ones we are used to seeing, made of aluminum with the lever that ratchets the cubes out of the tray.

These are heavy solid trays, almost troughs, and into them go metal lattices. The lattices are not articulated in any way, they are strong and quite rigid. They're a perfect fit in the trays.

Once frozen, getting them out of the tray is a piece of cake, just run hot water from the kitchen faucet over the bottom and the loaf of ice - with the lattice embedded inside - slips out of the tray in about two seconds.

But now, how to get the lattice out of the iceberg? As I said, they are inflexible and the ice is seized tightly in the lattice, so poking the cubes out with fingers is out of the question.

I've been getting by with running warm water over the iceberg until the individual cubes release from the lattice, but this is done at the expense of much of the volume of ice - the cubes are about half their original size when the operation is complete.

Lizzie! How was this done in 1934? I have modern plastic ice trays, but those cubes are already tiny and the original trough-sized trays are a perfect fit in the evaporator of the GE.
 

LizzieMaine

Bartender
Messages
33,715
Location
Where The Tourists Meet The Sea
I'm afraid this may take the knowledge base of someone like LizzieMaine. I've spent a lot of time online searching for even a hint of how, exactly, do early ice trays work?

I bought a second 1934 GE monitor top at an estate sale and it came with two original ice trays. But they're not the usual vintage ones we are used to seeing, made of aluminum with the lever that ratchets the cubes out of the tray.

These are heavy solid trays, almost troughs, and into them go metal lattices. The lattices are not articulated in any way, they are strong and quite rigid. They're a perfect fit in the trays.

Once frozen, getting them out of the tray is a piece of cake, just run hot water from the kitchen faucet over the bottom and the loaf of ice - with the lattice embedded inside - slips out of the tray in about two seconds.

But now, how to get the lattice out of the iceberg? As I said, they are inflexible and the ice is seized tightly in the lattice, so poking the cubes out with fingers is out of the question.

I've been getting by with running warm water over the iceberg until the individual cubes release from the lattice, but this is done at the expense of much of the volume of ice - the cubes are about half their original size when the operation is complete.

Lizzie! How was this done in 1934? I have modern plastic ice trays, but those cubes are already tiny and the original trough-sized trays are a perfect fit in the evaporator of the GE.
Let the tray sit at room temperature for a few minutes, and then take the tray in two hands and give it a strong twist. It won't flex much, but it should flex enough to make the cubes let go. If that doesn't do it, whack it sharply, against the edge of a table. That should loosen things up. Just not *too* hard, or the cubes may scatter around the room.

People had this same problem in 1934 -- and that's why the lever trays were invented in the first place.
 
Messages
10,930
Location
My mother's basement
I believe I’ve mentioned before how the automatic ice maker in my fridge/freezer sprung a leak so rather than bothering with a repair I just shut off its water supply and bought some plastic ice cube trays, which cost far more than they should and typically don’t last but a few months before they develop little cracks, which necessitates leaving them in the kitchen sink on refilling so that the leaking water goes down the drain rather than becoming an ice sculpture in the freezer,

But, other than that, they’re a helluva lot easier to use than the old metal trays.
 

JonnyHo

New in Town
Messages
1
Hello!

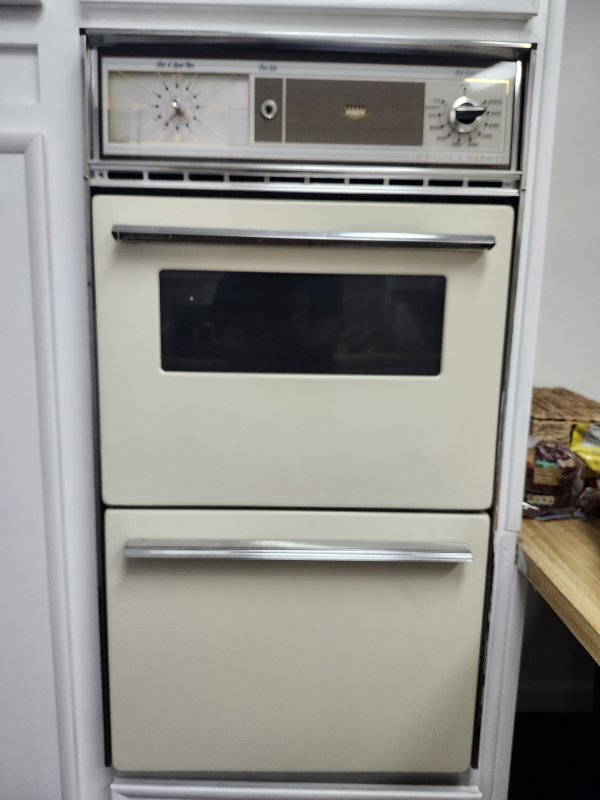
Can anyone identify the wall oven I have? I just bought a vintage mobile home and would like to restore the original appliances it came with.

The brand is an O'Keefe and Merritt(Tappan Inc.). The model number is AZ12621326 and the serial number is 0712617185722. I'm interested in finding out the year model it is along with whatever other info I can gather.

I've been looking online for an owners manual to see if there are any instructions as to how to remove it from the wall so I can take it to a repairman to repair the functionality of it. Everything works on it other than the natural gas stove and broiler. I'm guessing it's an ignitor or the regulator which doesn't require that I remove it but I would like for the repairman to do a general inspection to make sure everything is tip top.
 

Attachments

  • wall oven.jpg
    wall oven.jpg
    2.9 MB · Views: 36

1930artdeco

Practically Family
Messages
672
Location
oakland
You will have to go to either a mobile home repair place or a vintage stove place to get parts. Fortunately, they are easy to work on.

Mike
 

Rotary Dial

New in Town
Messages
3
Greetings!

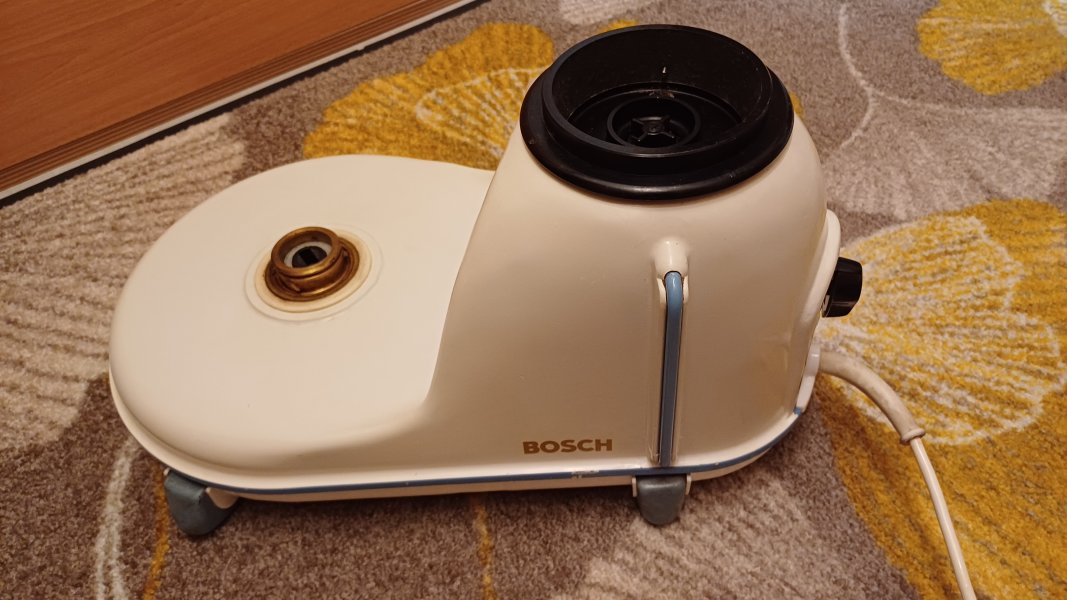
This is my 50's Bosch HM/KA 1 220 B kitchen machine I've been searching for around two years in my area, previous finds in classifieds were located too far away.
As it was defective (the interference suppression capacitor was exploded, a classic fault like the Rifa crackers) I got it very cheap together with the enamelled dough bowl and a blender.
The capacitor decided to break when the sellers tried the machine one last time before selling it, it took a bit of talking to persuade them of selling it anyway.
I didn't test it "under load" yet, I still need to do that.
It's highly recommended to get such a machine, the build quality is outstanding, the upper half of the case being die-cast metal and the mechanics very well repairable.
 

Attachments

  • 20240905_204919.jpg
    20240905_204919.jpg
    2.7 MB · Views: 29

Forum statistics

Threads
109,095
Messages
3,074,033
Members
54,091
Latest member
toptvsspala
Top