Want to buy or sell something? Check the classifieds
  • The Fedora Lounge is supported in part by commission earning affiliate links sitewide. Please support us by using them. You may learn more here.

More curl, please...

skyvue

Call Me a Cab
Messages
2,221
Location
New York City
I'm working on my new navy (it's black, really -- I can't see a hint of blue in it) Stylemaster, trying a) to get rid of the C-crown and replace with it with a center dent (since I already have a black -- or near-black grey Sydney with a sharp C-crown) and b) to get more upward curl in the brim (all the way around); it's too flat for my taste (though I suspect that places me in the minority here in the Lounge.

My Sydney has significantly more upward curl than either of the Stylemasters, and, though I fear it's a newbie-level question, I don't really know how to create more curl (and to ensure that it's even all the way around).

Returning the crown on this hat to an open-crown state is not easy -- the creases from the factory-based C don't give up the ghost easily -- but I think I can achieve that on my own. But I'm stumped on increasing the amount of upward curl in the brim.

Any suggestions?
 
I'd be interested in others suggestions as well, I've had a similar question, I have a campdraft, but it applies to any hat, how do you mantain the shape of the brim? I was going to snap it down in the front and the back, but then the sides droop making it look more like a bucket hat made of fur.

let's see what the 'pro's have to say...
rolleyes.gif
 

J.T.Marcus

Call Me a Cab
Messages
2,354
Location
Mineola, Texas
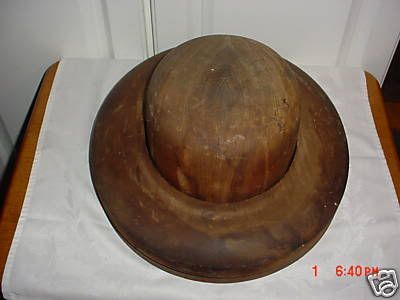
You need to reflange the brim. It takes a ring (same size as your hat), like the one around the block in this picture.

84b0_1.jpg


The process is described on this Akubra page about how hats are made.

http://www.akubra.com.au/creation.html

13. "One of the final processes is flanging. Here the hat is placed in a frame to give the brim its ultimate shape. A wet cloth is placed over the brim to help with the shaping and the bags of hot sand and pressure are carefully used to change the shape of the brim."
 

Bob Smalser

One of the Regulars
Messages
139
Location
Hood Canal, Washington
skyvue said:
Any suggestions?

If the felt has had lacquer or shellac sizing applied to stiffen it.....and if it's a large-brimmed Akubra like our Snowy River I'm sure it's got plenty.....then heat will soften the sizing, allowing you to reshape the felt. When the felt cools, the sizing will stiffen up, allowing the felt to retain the shape you molded into it when hot.

More curl? Add more steam, which is the easiest way to penetrate the center of the felt with even heat.
 

Davidson

One of the Regulars
Messages
153
Location
US
Here's what worked to add curl to brims for me:

Cut a 3/8" or 1/2" (1/2"gives more curl) strip of foam weatherstripping as long as the circumference of your brim. Tape the ends together, and arrange on an ironing board so that your hat's brim's edge, placed atop the foam, is resting on the foam. Brim turned up.

Heat up your steam iron. I seem to remember medium heat.

Wet a washcloth (or other cloth as you prefer).

(Optional, useful if you need more moisture.) Mist the brim, both sides, with water using a handheld sprayer.

Lay the wet cloth flat, no wrinkles, over a section of the brim.

Take a deep breath and apply the iron to the cloth, gradually using the tip of the iron to push the brim down towards the ironing board. (The tip should be from 1/2 to 3/4 of the way from the inside out towards the edge of the brim. Using the tip this way increases the curl. Keep the iron moving slowly. The brim will be stiff until the stiffener relaxes from the moist heat, so be patient.

Once you have satisfactorily worked your way around the brim, let the hat cool and dry in place. You might put a weight on top of the crown to help hold the curl in.

Try this at your own risk. It worked for me. I am careful, but not gentle, with my hats.
 

carldelo

One Too Many
Messages
1,568
Location
Astoria, NYC
Davidson, I'm not getting the picture - is the hat right side up or upside down during the ironing? Is the brim snapped up all around during the ironing? Thx
 

Davidson

One of the Regulars
Messages
153
Location
US
carldelo said:
Davidson, I'm not getting the picture - is the hat right side up or upside down during the ironing? Is the brim snapped up all around during the ironing? Thx
I wrote the above with the hat right side up. You can also do it with the hat upside down, without the foam brim ring (see text below). The brim is, in either case, curled up (relative to the crown) all the way around.

I posted most of the text below a while back. There were pics, they seem to be gone now. Doing the ironing with the hat sitting on the ring provides some confidence. Once you kinda get the hang of what's happening, turning the hat upside down and ironing "freehand" is faster.
================
Shaping a brim

Comments: 1/2" rise (or drop, when snapped down) on a 2 3/4" brim is about right for me. Other tastes will vary. Steps 1 - 6 are one alternative to brim shaping. At the bottom is another alternative.

Supplies: steam iron and ironing board, 4 feet of 1/2" wide foam weatherstrip, 2 inches of duct, masking or other tape, spray bottle of water, dry cloth, wet cloth for steaming.

1. Make a brim ring. Put the hat on the ironing board brim down. Take the foam strip and wrap it around the edge of the brim. Cut slightly overlength. Now more carefully place the foam on top of the edge of the brim. Cut to exact length. Use the duct tape to connect the ends of the foam to make a closed oval shape.

2. Wet the brim, top and bottom with the spray bottle. Run a finger over the brim so the entire brim, top and bottom, up to the crown is thoroughly wet. Try to keep the crown dry. Dry the sweatband with the dry cloth.

3. Lay the wet cloth across one section of the brim. Iron. Rotate the hat and repeat. You are heating and wetting the brim to make it more flexible. Go around a few times, keeping the cloth wet with the spray bottle as needed. On the last pass, go pretty quickly to try to get the brim evenly hot and wet.

4. Set the hat onto the foam ring. Fiddle with getting the ring evenly under the brim edge all the way around. Push gently down on the crown so the sweatband touches the ironing board all the way around. This puts a curl in the brim (temporarily).

5. Go gently with the tip of the iron around the brim, pressing down gently with the tip halfway out on the brim. This helps deepen the curl. Once the brim is behaving in general, use the iron and your fingers to tweak spots on the edge into line. Don't burn yourself.

6. Let the hat cool and dry on the brim ring for several minutes. If you want, you can gently lift the hat and tweak the brim while it is still somewhat pliable. Let dry, either on the brim ring or on the crown. Don't snap the front of the brim down until the hat is dry, it takes out the curl.

Alternative:
Skip step 1 above (no foam ring is used). Wet the brim as in step 2 above and iron as in step 3. Then, turn the hat gently upside down on its crown. Iron the brim freehand with light pressure, letting gravity do its work as the brim softens as you work your way around the brim. Use the iron and your fingers (hot!) to tweak recalcitrant parts.

Parting comment: Either way, work more on the outer section of the brim than on the inner. Where the briim meets the sweat has a little curve to it, and you don't want to make it a sharp 90 degree angle by ironing it flat.

I hope that clears it up.
 

carldelo

One Too Many
Messages
1,568
Location
Astoria, NYC
OK, thanks

Careful reading of this description clears up my confusion - thanks. Not sure I'm ready to try it, but at least I get the idea. I wish I had a flange to use, maybe a good summer DIY project.
 

Davidson

One of the Regulars
Messages
153
Location
US
carldelo said:
Careful reading of this description clears up my confusion - thanks. Not sure I'm ready to try it, but at least I get the idea.

Probably wise. Try it first, if at all, on a hat you don't care about.

carldelo said:
I wish I had a flange to use, maybe a good summer DIY project.
I actually looked at toilet seats at Home Depot (with hat in hand). lol Shape's not too bad on some, but the dimensions are wrong.lol

I think I did come across a source of plastic flanges on the web, maybe it was mentioned here. I think they were not heat-resistant?
 

Forum statistics

Threads
109,140
Messages
3,074,927
Members
54,121
Latest member
Yoshi_87
Top