Want to buy or sell something? Check the classifieds
  • The Fedora Lounge is supported in part by commission earning affiliate links sitewide. Please support us by using them. You may learn more here.

Gentlemen, show us what you've made!

Qirrel

Practically Family
Messages
590
Location
The suburbs of Oslo, Norway
Quirrel: I really like the idea of a summer blazer. Quite dandy. Do you plan to wear it with white or cream pants? 4 buttons would really look edwardian. Not sure about that. 3 rather high buttons would make a 20s look? (the bottom button at the height of the pocket opening?)

Yup. I have just acquired a pair of tennis trousers from the 1930s to use with it. (Come at me, summer!) And I think I will go for three buttons; in the picture the lapel rolls a bit higher than it will do when finished, and with three buttons the distance between them looks balanced.
 

Nick D

Call Me a Cab
Messages
2,166
Location
Upper Michigan
Quirrel and HbK, inspiring!

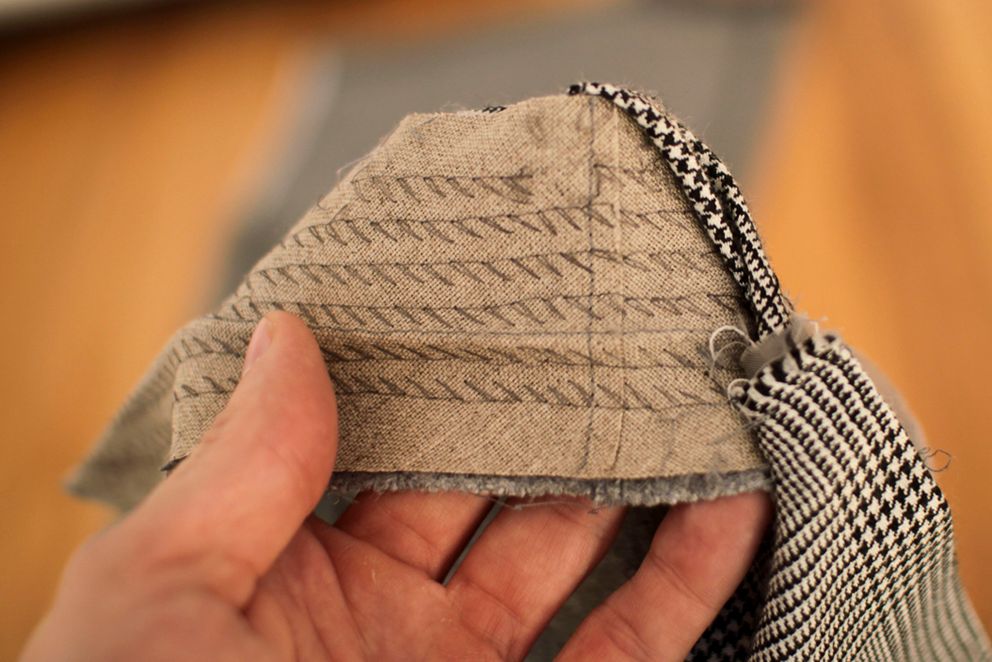
HbK, I'm curious, if you're hand-felling linings on the body and pockets, why machine padstitch the collar? Is it to save time, or is it for the particular effect on the finished collar?
 

herringbonekid

I'll Lock Up
Messages
6,016
Location
East Sussex, England
HbK, I'm curious, if you're hand-felling linings on the body and pockets, why machine padstitch the collar? Is it to save time, or is it for the particular effect on the finished collar?

Nick, the patch pocket linings are hand felled because i personally find it less annoying to do than the machine method which involves cutting a slightly smaller lining than the pocket-front and easing the two together along the seam allowance.

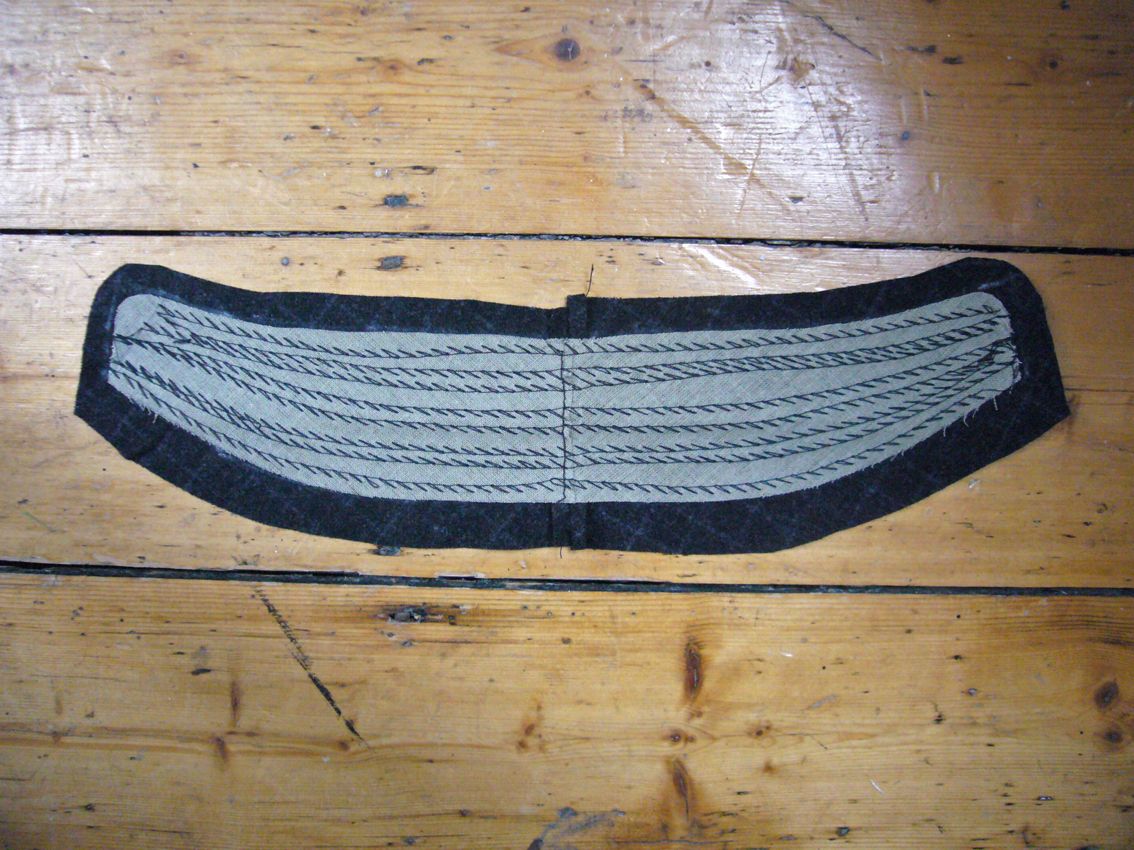
Of the three vintage jackets i've taken apart two of them were machine padstitched on the undercollar (and on the lapel too). i don't think there's any noticeable difference in the finished collar. i just try to do the vintage production method where possible.


(btw, i wouldn't recommend using a blind-stitch machine on the lapel of a smarter, worsted pinstripe fabric. i only use it on thick tweedy / flannel topstitched sporty jackets, lightweight summer jackets, or heavy overcoating).
 
Last edited:

herringbonekid

I'll Lock Up
Messages
6,016
Location
East Sussex, England
this undercollar is taken from a $4600 Ralph Lauren jacket (not by me i hasten to add, by the owner of the blog below).
you can see it is done exactly the same way as mine, except it's on melton, not suit fabric.

Jeffery D describes the centre seam as 'old school'.

Purple_label_collar.jpg


L1040472.jpg


image courtesy of http://tuttofattoamano.blogspot.co.uk/
 
Last edited:

Qirrel

Practically Family
Messages
590
Location
The suburbs of Oslo, Norway
Making a collar pattern.
img3267qb.jpg


Making up the collar, by machine this time. As hbk says, it does not make a huge difference from a hand-padded one.
img3269o.jpg


Ironwork done to the collar. This is where the important shape comes from.
img3270w.jpg


Basting and felling the collar on.
img3271i.jpg


Basting the edge over.
img3272tg.jpg


Checking the fit.
img3274m.jpg


Finishing.
img3275xf.jpg


After buttonholes have been sewn, and the buttons put on, the jacket is finished.
img3277vd.jpg
 

Swing Motorman

One of the Regulars
Messages
256
Location
North-Central Penna.
Speaking of buttons and jackets...


[edit- poor cell phone pic removed. See post below for better images!]


Lehigh Valley Transit Co. coat button, reproduced from an original by using a clay mold, a brass cotter pin, gold oven-bake clay, and some spray paint and finishes. Three more and I'll have enough to outfit a fine single-breasted uniform coat!
 
Last edited:

Methuselah

One of the Regulars
Messages
281
Location
Manchester, England
Nice work everybody.
About that button - I'd be interested to see how much (if any) detail is lost in the mould-making & casting process. Could you post a side by side photo with it next to the original please?
 

Swing Motorman

One of the Regulars
Messages
256
Location
North-Central Penna.
Thanks for your interest in my humble reproduction work! The buttons lost very little detail depth in the molding process. Using baby powder to help the mold let go of the original and the cast repros let go of the mold helped immensely!

Check out the difference baby powder makes: the top badge was made with poweder, the lower-left one without. Original is at lower-right.
IMG_9975.JPG


The only visible loss (aside from occasional damage while molding) is the intricate background of horizontal lines. But in the right light, you can still clearly see them! The original is on the white label card, and the repro sewn onto a jacket.
IMG_9951.JPG


The detail is easier to see once the button gets worn and dirty.
IMG_9953.JPG


From head-height, you can hardly tell the difference between the two!
IMG_9955.JPG


I'm looking forward to doing more projects like this whenever I find the need! This is fun stuff. :)

-Steven
 

Shangas

I'll Lock Up
Messages
6,116
Location
Melbourne, Australia
The closest I've ever gotten to a needle and thread is repairing my clothes (sewing on buttons, stitching up ripped or broken seams, etc).

I'm not trying to dive right in and make an actual article of clothing of any kind. But for a while now, I've wanted to make a cosy for this:

IMG_0251.jpg


In case you don't know what it is (and I apologise for the quality of the photograph), it's an antique copper hot-water bottle.

I've never measured it, but I'd say it holds about two or three pints of water. Filled up to the brim with boiling hot water, it'll keep a bed warm on a winter's night for about 9-12 hours of worthwhile heat. Not bad for something that's probably approaching 80 or 90 years old.

Thing is, once it's full of scalding hot water, the metal heats up VERY fast and it's nigh impossible to hold, as a result (even if you use the little loop-handle at the top there).

I know these bottles used to come with bags or cozies that you could wrap around them to stop burning your hands, but still enjoy the heat. Unfortunately, this bottle doesn't have one.

So I'm attempting to make my own.

The bottle has a diameter of 8 inches, a height of 4 inches. A circumfrence of roughly 24 inches.

I pinched an old cushion-cover from a thrift-shop for the heady price of $1 and I'm busy cutting up the fabric to make the cosy. I haven't quite decided what this thing'll look like yet, but I've got a rough idea.

Unfortunately, I don't have a sewing-machine with me (at least, not one I feel confident using), so when the time comes, this thing'll be literally handmade!

Wish me luck!

...Oh...and the cosy will be a dark red in colour :)
 

Gin&Tonics

Practically Family
Messages
899
Location
The outer frontier
Not clothing, but a gentleman's accessory...

Made the pipe from an old mahogany pipe bowl, .303 British casings, bamboo and a plastic mouthpiece. The tamper is made from a deer's antler with a cap made from another .303 British casing.
kiseruandtamper.jpg
 

Shangas

I'll Lock Up
Messages
6,116
Location
Melbourne, Australia
A night and a day later and I have finished my bottle-cosy!

Materials Used:

- One red cushion-cover.
- Black thread.
- Sewing needle.
- String.
- Big needle.
- Tailor's measuring-tape (thanks to my grandmother!)

Method:

Cut away the seams on the cushion-cover and open the cloth all the way up. Measure out likely dimensions and test thoroughly with the hot-water bottle.

Measurements:

13 inches wide.
24 inches (two feet) long.

Bottle:

24 inches around.
4 inches high.
8 inches diameter.

Took a while to figure out how I would do this, but in the end, I went for the traditional drawstring pouch approach. Working with a ROUND object obviously has challenges, but I worked the cloth around the bottle, so that I could use it as a mold and get the shape and the cuttings and the angles and stitching right.

I don't have a sewing-machine at my disposal, so every single stitch was done by hand. And when I'd finished, I did double-stitching over the seams again, to reinforce them (having a bottle rip out of this bag when it's full of boiling water will NOT be fun!).

Then, I removed the bottle from the bag and flipped it inside out...or...outside in...so that the stitches would be hidden and the nice, clean seams would be visible to the outside world.

Then, I bunched up the opening of the bag around the top of the bottle and using a big needle and some cooking-twine, I ran two double-drawstrings around the bag and tied them off at opposite ends so that I could open the bag, remove the bottle, replace it and draw the bag shut. I left enough string on the ends so that I could tie up a nice bow.

Here are the results.

The hot water bottle sans cosy:

IMG_0826.jpg


The hot water bottle with cosy:

IMG_0827.jpg


...and upside down:

IMG_0828.jpg


Opened:

IMG_0829.jpg


Inside out, to show the stitching:

IMG_0830.jpg
 
Last edited:

Forum statistics

Threads
109,298
Messages
3,078,221
Members
54,244
Latest member
seeldoger47
Top