Toss in some vintage hats, or...some other hats....????A calendar sounds interesting, but unless Tim makes 9 more hats by November, how would that be achieved? Unless we (Tim and I), use our personal hats, be it custom or vintage.
Want to buy or sell something? Check the classifieds
-
The Fedora Lounge is supported in part by commission earning affiliate links sitewide. Please support us by using them. You may learn more here.
You are using an out of date browser. It may not display this or other websites correctly.
You should upgrade or use an alternative browser.
You should upgrade or use an alternative browser.
Alley Kat Hat Co
- Thread starter pjt113
- Start date
Cane Rod Maker
Vendor
- Messages
- 1,128
Kurt....upload sample liner please.
bolthead
My Mail is Forwarded Here
- Messages
- 3,905
- Location
- Pennsylvania, United States
Tim finally got a few sample Liners in the other day, (4) different combinations..... as a tease, I will post 1 each day. Here is Monday's --------->
It is a black liner, w/ a white top insert. The logo on this one is a tanish colored fedora with the fire themed lettering. These photo are from Tim's phone and let me tell you, they don't do them justice.....you have to see how amazing they look in hand. These are going to really set off the AKHC collection.....how do you say? "The Kat's meow"?

It is a black liner, w/ a white top insert. The logo on this one is a tanish colored fedora with the fire themed lettering. These photo are from Tim's phone and let me tell you, they don't do them justice.....you have to see how amazing they look in hand. These are going to really set off the AKHC collection.....how do you say? "The Kat's meow"?

Last edited:
Cane Rod Maker
Vendor
- Messages
- 1,128
The photo isn't the best. In hand so much better....Kurt did my color pencil art. I supplied multiple overlays to the vendor. They did a outstanding job.
GEEZ! That is letting the "Kat" out of the bag! Haha! O.K. that is very nice, eye catching!The photo isn't the best. In hand so much better....Kurt did my color pencil art. I supplied multiple overlays to the vendor. They did a outstanding job.
- Messages
- 15,259
- Location
- Arlington, Virginia
The photo isn't the best. In hand so much better....Kurt did my color pencil art. I supplied multiple overlays to the vendor. They did a outstanding job.
Looks super, Tim! Can't wait to see the other color combos. I am really enjoying the hat, brother.
Kurt, thanks for sharing. You're killing me with the wait...all week.
Last edited:
ChicagoWayVito
Practically Family
- Messages
- 699
Since I am working with Tim from afar on a hat, I thought it would be appropriate to post some images here with some description. Tim has been providing other guidance on hat making that I hadn't picked up from Jim at JW Hats. This hat is not yet completed but I will show the different stages from what the hat looks like after ironing, pouncing, burning, and luring. The pictures are all from my cell phone, sorry about that.
After blocking the hat, I spent 1 hour ironing the crown. Now it was longer than one hour as every 10 - 20 minutes I stopped to let the crown cool down but there was a total of 60 minutes ironing on the crown.
No Flash With Flash
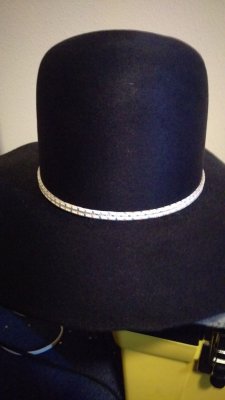
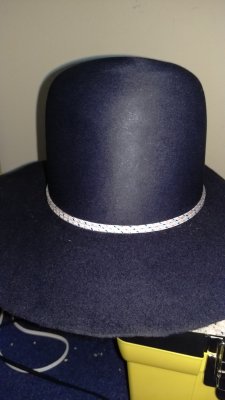
After ironing, I started working on pouncing. I did 3 passes each with a different sandpaper grit. I progressed in this order 240, 320, 600. I could make the case to have stopped after each of the sandpaper grits, just really depends on the finish one wanted to achieve. Click on the images to view close up.
240 Grit 320 Grit 600 Grit
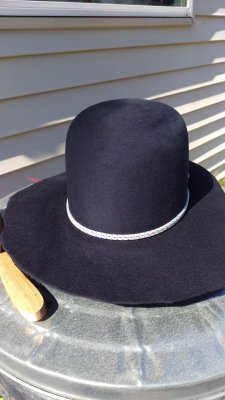
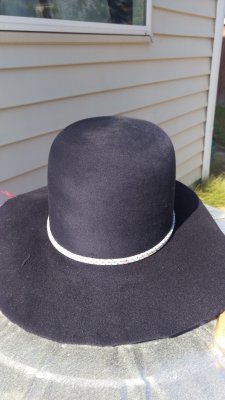
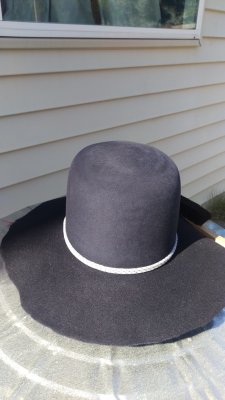
After pouncing I was wanted to try something I have seen a few other hatters do. BURN the felt. Note I would only do this on a dark felted hat unless I was trying to distress a hat like Nick Fouquet or some of the others out there. I sprayed the crown with 91% isopropyl alcohol and set it on fire, only letting it burn a couple of seconds and then blowing it out. Does add a nice feel to the hat. I don't have a picture of it on fire as it was just me and a bit nerve wrecking.
After Burning
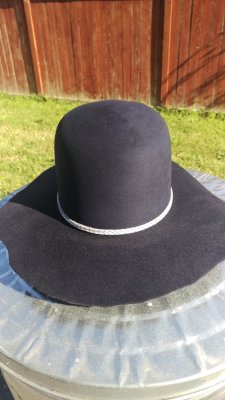
Lastly I finished up by luring the crown. This happened another day so the do not have great lighting so it might be hard to compare to the others. But I also have a close up shot.
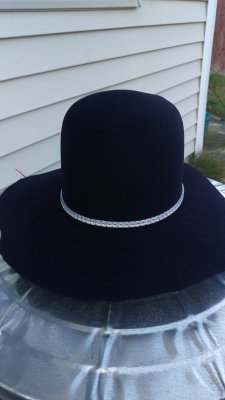
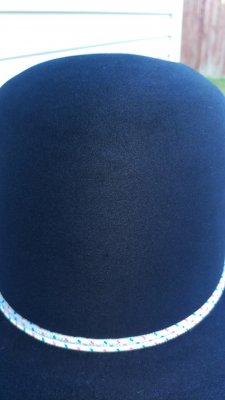
The crown feels super soft and supple right now and I am very excited how this one will end up turning. I hope this was interesting and useful to a few of you. Questions or feedback welcome.
After blocking the hat, I spent 1 hour ironing the crown. Now it was longer than one hour as every 10 - 20 minutes I stopped to let the crown cool down but there was a total of 60 minutes ironing on the crown.
No Flash With Flash


After ironing, I started working on pouncing. I did 3 passes each with a different sandpaper grit. I progressed in this order 240, 320, 600. I could make the case to have stopped after each of the sandpaper grits, just really depends on the finish one wanted to achieve. Click on the images to view close up.
240 Grit 320 Grit 600 Grit


After pouncing I was wanted to try something I have seen a few other hatters do. BURN the felt. Note I would only do this on a dark felted hat unless I was trying to distress a hat like Nick Fouquet or some of the others out there. I sprayed the crown with 91% isopropyl alcohol and set it on fire, only letting it burn a couple of seconds and then blowing it out. Does add a nice feel to the hat. I don't have a picture of it on fire as it was just me and a bit nerve wrecking.
After Burning

Lastly I finished up by luring the crown. This happened another day so the do not have great lighting so it might be hard to compare to the others. But I also have a close up shot.


The crown feels super soft and supple right now and I am very excited how this one will end up turning. I hope this was interesting and useful to a few of you. Questions or feedback welcome.
DJH
I'll Lock Up
- Messages
- 6,355
- Location
- Ft Worth, TX
I'm confused, is Tim making this hat, or someone else?
Bob Roberts
I'll Lock Up
- Messages
- 11,201
- Location
- milford ct
I believe Tim is not making the hat. Kevin (Vito) is.I'm confused, is Tim making this hat, or someone else?
Since I am working with Tim from afar on a hat, I thought it would be appropriate to post some images here with some description. Tim has been providing other guidance on hat making that I hadn't picked up from Jim at JW Hats. This hat is not yet completed but I will show the different stages from what the hat looks like after ironing, pouncing, burning, and luring. The pictures are all from my cell phone, sorry about that.
After blocking the hat, I spent 1 hour ironing the crown. Now it was longer than one hour as every 10 - 20 minutes I stopped to let the crown cool down but there was a total of 60 minutes ironing on the crown.
No Flash With Flash
View attachment 54125 View attachment 54126
After ironing, I started working on pouncing. I did 3 passes each with a different sandpaper grit. I progressed in this order 240, 320, 600. I could make the case to have stopped after each of the sandpaper grits, just really depends on the finish one wanted to achieve. Click on the images to view close up.
240 Grit 320 Grit 600 Grit
View attachment 54127 View attachment 54128 View attachment 54129
After pouncing I was wanted to try something I have seen a few other hatters do. BURN the felt. Note I would only do this on a dark felted hat unless I was trying to distress a hat like Nick Fouquet or some of the others out there. I sprayed the crown with 91% isopropyl alcohol and set it on fire, only letting it burn a couple of seconds and then blowing it out. Does add a nice feel to the hat. I don't have a picture of it on fire as it was just me and a bit nerve wrecking.
After Burning
View attachment 54130
Lastly I finished up by luring the crown. This happened another day so the do not have great lighting so it might be hard to compare to the others. But I also have a close up shot.
View attachment 54131 View attachment 54132
The crown feels super soft and supple right now and I am very excited how this one will end up turning. I hope this was interesting and useful to a few of you. Questions or feedback welcome.
Please let us know what color is this hatbody? Looks dark grey or black or blue?
- Messages
- 19,580
- Location
- Funkytown, USA
Since I am working with Tim from afar on a hat, I thought it would be appropriate to post some images here with some description. Tim has been providing other guidance on hat making that I hadn't picked up from Jim at JW Hats. This hat is not yet completed but I will show the different stages from what the hat looks like after ironing, pouncing, burning, and luring. The pictures are all from my cell phone, sorry about that.
Lastly I finished up by luring the crown. This happened another day so the do not have great lighting so it might be hard to compare to the others. But I also have a close up shot.
The crown feels super soft and supple right now and I am very excited how this one will end up turning. I hope this was interesting and useful to a few of you. Questions or feedback welcome.
Can you describe the luring process in more detail, please?
Preacher Man
A-List Customer
- Messages
- 327
- Location
- South Central Kentucky, USA
Tim that liner is great! This will add a nice touch to the great hats you make, adds the right touch of class I think! And Kurt, as always your photography is really good!! Keep going!!
Very cool,Tim.Tim finally got a few sample Liners in the other day, (4) different combinations..... as a tease, I will post 1 each day. Here is Monday's --------->
It is a black liner, w/ a white top insert. The logo on this one is a tanish colored fedora with the fire themed lettering. These photo are from Tim's phone and let me tell you, they don't do them justice.....you have to see how amazing they look in hand. These are going to really set off the AKHC collection.....how do you say? "The Kat's meow"?

Cane Rod Maker
Vendor
- Messages
- 1,128
I'm confused, is Tim making this hat, or someone else?
Guys, sorry for any confusion. KEVIN aka Chicago Way Vito politely asked if he could pay me a compliment here in this thread showing off what I taught him through words and pictures . A few weeks back I offered to help him. He has taken a few road trips and has some skills. So I offered him advice on how to do his project. He is showing you all what we accomplished through simple communication. Thanks for understanding and having said that, hope nobody takes issue with his post. Thanks all!
Cane Rod Maker
Vendor
- Messages
- 1,128
Can you describe the luring process in more detail, please?
Luring....It a process using oil.
When. I recently asked a hatter this question, which was just to confirm product, I was told he charges 1000.00 for this in his training course. That was the end of the conversation .
And I had just spent nearly a thousand dollars on ribbon a few days earlier.
DJH
I'll Lock Up
- Messages
- 6,355
- Location
- Ft Worth, TX
Guys, sorry for any confusion. KEVIN aka Chicago Way Vito politely asked if he could pay me a compliment here in this thread showing off what I taught him through words and pictures
Thanks Tim & Bob too.
Tim, your new liner design looks great.
- Messages
- 19,580
- Location
- Funkytown, USA
Luring....It a process using oil.
When. I recently asked a hatter this question, which was just to confirm product, I was told he charges 1000.00 for this in his training course. That was the end of the conversation .
And I had just spent nearly a thousand dollars on ribbon a few days earlier.
LOL. The check is in the mail!
Featured products
-
 John Lofgren Monkey Boots Shinki Horsebuttt - $1,136 The classic monkey boot silhouette in an incredibly rich Shinki russet horse leather.
 -
 Grant Stone Diesel Boot Dark Olive Chromexcel - $395 Goodyear welted, Horween Chromexcel, classic good looks.
 -
 Schott 568 Vandals Jacket - $1,250 The classic Perfecto motorcycle jacket, in a very special limited-edition Schott double rider style.
You start out with a minnow...(teasing ya)....Can you describe the luring process in more detail, please?
bolthead
My Mail is Forwarded Here
- Messages
- 3,905
- Location
- Pennsylvania, United States
Thank you very much.Tim that liner is great! This will add a nice touch to the great hats you make, adds the right touch of class I think! And Kurt, as always your photography is really good!! Keep going!!
bolthead
My Mail is Forwarded Here
- Messages
- 3,905
- Location
- Pennsylvania, United States
I'll post the rest of the liners tomorrow. I didn't have a chance today, sorry.
Similar threads
- Replies
- 19
- Views
- 2K
Members online
- undakovr
- D.MAC-OLEY
- Alfredodelavega
- Shawnziee
- DaveProc
- Retserrof
- Jasonissm
- torfjord
- Stevenh969
- postman10mm
- semolina_pilchard
- Nousdefions18e
- BarryMcCockiner_PhD
- dangibbons1981
- Boomerang
- hatsRme
- r.jenkins0912
- yww
- Peacoat
- Guppy
- Will Zach
- Egalter
- NateNate
- bluecrayon22
- jay_cali
- TartuWolf
- Kenan
- Sir_Tops_Alot
- Nickelman2005
- JoeNiblick
- Kfz
- LaymanX
- Bfd70
- quikrick
- Pellie
- Drzdave58
- Fading Fast
- 5thumbs
- Dylan704
- a1pathfinder
- Mihis
- leathden
- AlexWolfson
- Tyler Durden
- voodootomato
- Fedster
- Woolen_ up
Total: 3,117 (members: 60, guests: 3,057)